44°55′7″ N 75°50′5″ W
When we purchased Santosha in 2017 it had a teak swim platform on the stern that was the full width of the transom.
I removed the platform and the transom mounting brackets while my fiberglass contractor was refinishing the hull.
It had obviously been on the boat for many years and was not in very good shape. It was a bit “springy” in a few spots between the mounting brackets and was also beginning to come apart at some of the joints. This was likely due to the platform being sanded and stripped several times over the years for refinishing.
Last year I added some hardwood pieces as a temporary fix to try and strengthen the weak spots. They helped a bit but looked awful. Bottom line was that I needed a new swim platform soon so I started researching my options. I also began paying much closer attention to ones that I saw on other boats during my travels.
Teak is very expensive so I figured I had 4 main choices (listed below in order of my preference):
- another type of wood
- marine grade plywood covered with fiberglass
- engineered or synthetic wood
- aluminum
I like woodworking projects but felt that this was quite a bit beyond my skill level – plus I don’t have the tools needed to do the job properly. I talked to Jim and Steve Flewitt at Aylings Boatyard in Merrickville where Santosha is stored and they suggested that I consider using mahogany because this type of wood stands up well to constant exposure to water and it is considerably cheaper than teak. They also had the skills and equipment needed to build a new one for me right on site at a reasonable price. With that information at hand it was an easy decision for me.
They started the build with six rough cut mahogany planks each measuring 2″ thick x 10″ wide x 12′ long. I asked Jim if I could help so he assigned me the job of pile-it. He cut the wood and I piled-it. That was the full extent of my involvement in this project :).
Jim set up their table saw. It cut the planks into long strips measuring about 1 1/2″ wide (by 12′ long). We ended up with about 20 strips of mahogany ready for final sizing.
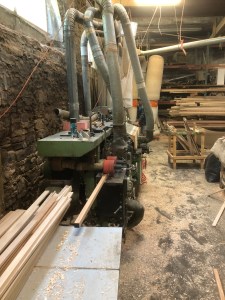
Jim’s next step was to run all of the strips through a 4-dimension planer which planed and sized each strip to the final dimensions in one pass (approximately 1″ thick x 1″ wide by 12′ long).
Now it was time for assembly. We had decided to make the new swim platform roughly the same dimensions and layout as the original – with some modifications to improve the swim platform’s function when installed. The original swim platform was the same width as the boat’s transom. I wanted the new swim platform to be a few inches narrower than the transom on each side because if I was not really careful the outside edge of the original platform would rub up against the dock as I pulled away. Hopefully a slightly narrower swim platform will stop this from happening so much.
Jim laid out a template on his workbench that matched up with the inside curve of the transom and also ended in a gentle curve on the outside edge. Laying this out was much more complicated than I had anticipated. I did not realize that the transom had such a curve in it – I always thought that it was basically flat from port to starboard – not so!
Long strips of mahogany were spaced apart using shorter strips. This design uses much less wood, makes the platform lighter without sacrificing strength, and allows water to quickly drain away when the boat is travelling in rough waters.
All pieces were clamped, glued and screwed into place. Jim’s design allowed for the screws to only go into the adjoining piece of wood through the sides and then each screw head is completely covered by the next strip. By doing it this way no screws are exposed to water, reducing the opportunity for wood rot. The swim platform is also designed to be fastened to the transom’s stainless steel mounting brackets from the bottom so no screw heads will be exposed on the top.
Once the build was finished Jim sanded the wood and ran a router with a smooth edge bit around the perimeter and around the inside of each divider section.
The final step was to stain the wood followed by several coats of varnish. The end result is fantastic and will really look smart when it is installed on Santosha next spring.
Thanks Jim!
If you need a new swim platform for your boat be sure to call Jim and Steve at Aylings!


 Lat/Long: 44.918701, -75.835843


